The FIRST Robot Controller Console
Once you access the web tool, you will be greeted with a screen like this:

On the red bar at the top, you can select if you want to program with Blocks or OnBotJava. Since this is an OnBot Java tutorial, click on “OnBotJava”.
The Editor
You should now be at this screen:

At the left side of the screen is the Project Files area. This is where all of the programs that you write will be stored. Above this area are various button icons:
- Settings (gear) – allows you to tweak specific settings of the editor
- Undo (circular arrow) – reverts the last change that you made to your program. Can also be activated by pressing Ctrl+Z (⌘+Z on a Mac) on your computer’s keyboard.
- Add File (plus sign) – opens a prompt that allows you to name and create a new program
- Upload Files (up arrow) – allows you to upload program files from your computer into the project. Note that Java programs are stored as .java files (example: BasicDrive.java).
- Collapse this window (minus sign) – closes the Project Files area to allow more space on the screen for the code editor.
There is also a button with a wrench icon in the bottom right of the screen. This is called the Build Everything button. While your Java programs will save automatically, they need to be “built” in order to run on the robot. So, whenever you make a change to a program, you need to press the Build Everything button so that your programs can be built and ran on the robot. Keep in mind that since this button builds every program, an error in any of your programs, even one that you aren’t using, will cause the entire build to fail.
Creating a New Program
Let’s click the Add File button to create a new program. A prompt like this should pop up:
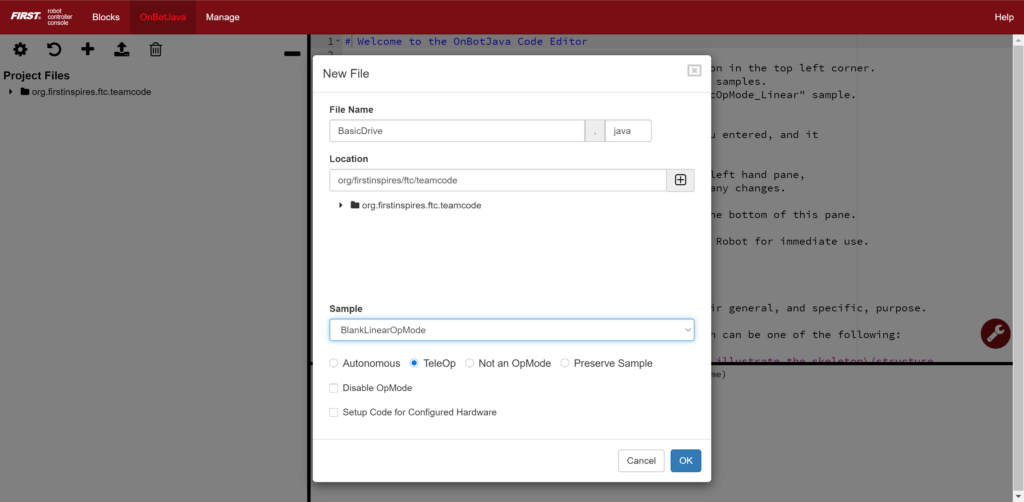
In the File Name option, I named my program “BasicDrive.” It is good practice to name your programs using Pascal case, meaning that you don’t use any spaces and you capitalize the first letter of each word.
The Sample option allows you to choose a sample program to generate your program from. For this guide, let’s select the “BlankLinearOpMode” sample, which will generate a “bare bones” program structure for us to write code in.
Below the Sample option is various options for the type of program. Programs that control the robot are known as OpModes, and there are two types of OpModes:
- Autonomous – in competition, Autonomous OpModes automatically control robots for the first 30 seconds of the match.
- TeleOp – in TeleOp OpModes, drivers manually control the robots for the rest of the match.
For this guide, we will select the TeleOp option.
Next Steps
Once you create your new program called “BasicDrive”, code should appear in the right area of your screen. Check out the Java Syntax Basics guide to learn the basics of Java programming and the FTC Java Basics guide to learn how this Java code works and how to start adding your own code.